Learn to Connect YouTube with Twitter Account

YouTube with TwitterDo you want your activities on YouTube to be automatically tweeted to you on your Twitter account? Well, then you have to get your YouTube account connected to your Twitter account. Having done so you will get tweets on when you have uploaded a video or subscribed to a channel on YouTube. You may easily bridge the gap between YouTube and Twitter and your friends may just log on to Twitter to know your activities on YouTube. If you have the confidence to do the connection yourself, do so or else contact an online technical support provider for offering assistance.

• Step 1: Firstly the user must login to his/her YouTube account.

• Step 2: Once the account opens, you must click on the YouTube username that is visible at the top right side.

• Step 3: Now go to “Account Settings” and then access “Activity Sharing”.

• Step 4: Check the options under the category labeled “What activities do I share?” and click on the options that you would like to share.

• Step 5: Now click on the link labeled “Twitter - Connect accounts”.

• Step 6: The user is now required to login to the YouTube account once more and he/she will be redirected to the Twitter page.

• Step 7: You have to enter your Twitter username and password and then click the Allow button. There will be verification and then you will be redirected to YouTube. The connected account is visible in the Activity Sharing section.

• Step 8: Finally click on the “Save Changes” button for saving the settings.

This should get the job done. If you face any problems contact a remote PC support provider immediately.

Ways to Apply Folder Settings to All Folders in Windows XP

Folders in Windows XPIf you are using the Windows XP operating system, you have the opportunity to apply folder settings to all Windows XP folders. After the user has changed the settings of a folder, users expect that all folders in Windows will open in the same way. This can be done. The user just has to apply the settings of a folder they prefer to all the other folders in their operating system. You may do it yourself or may seek the online computer repair services for assistance.

• Step 1: Open the folder for which the settings have been changed according to your preferences.

• Step 2: Now from the menu bar, the user must select the “Tools” option and then access the “Folder Options”.

• Step 3: In the Folder Options window, the user must choose the “View” tab.

• Step 4: Now look for the button that is labeled “Apply to All Folders” and click on it.

• Step 5: Finally, the user must click on “OK” for saving the settings and then close the Folder Options window.

This should give uniform settings to all the folders in your Windows XP computer system. In case you are still facing problems, you may contact a remote PC support provider for help on computer issues.

How to Find Your Wi-Fi Password on PCs and Macs

Don’t know how to locate your Wi-Fi password on the computer? The process is very easy and simple. Before delving deeper into the process on how to perform this task, one thing should be mentioned that your Wi-Fi password is very important and with this password anyone can join your network through a laptop. So, it needs to be stored in a safe and secure place.

Let’s take a look at how to at how to find Wi-Fi password on your PC.

• Step 1: First, you need to download "Wirelesskeyview." You may download it from “CNet.com.”

• Step 2: Save the file on your computer.

• Step 3: Double-click the file to run the program. The password will be displayed in the program's window.

Given below are the steps to find Wi-Fi password on MAC.

• Step 1: First you need to click the “Finder” icon on your dock.

• Step 2: Select “Go” and “Applications” from the drop-down menu.

• Step 3: Double-click the "Utilities" folder

• Step 4: Double-click the "Keychain Access" button.

• Step 5: Next, double-click the name of your network, and check the box next to "Show Password."

• Step 6: Insert your System Administrator password, and click "OK."

These are the steps to find the Wi-Fi password on PCs and Macs. If you need assistance, talk to an online tech support provider.

Way to Bypass Recycle Bin When Deleting Files in Windows 7

Whenever you delete a folder or a file while working on Windows, you know that it gets stored in the Recycle Bin. Recycle Bin lets the user delete the files and folders permanently or choose to restore them later. Windows 7 operating system also lets the user bypass the Recycle Bin and then delete the files permanently. This can be done by following certain steps or you may also choose to take the help of a remote PC support provider. Note that by bypassing Recycle Bin, you will not be able to restore the deleted files from the Recycle Bin.


Recycle Bin• Step 1: Right click on the Recycle Bin icon that is available on your desktop.

• Step 2: Select Properties from the list of options available
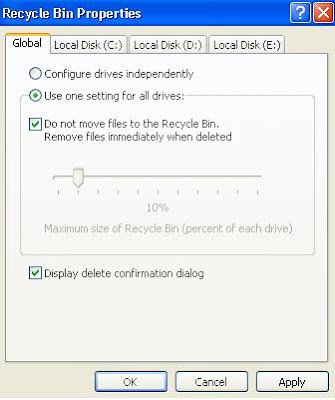
• Step 3: From the Recycle Bin Properties window, the user must select “Do not move files to Recycle Bin” option

• Step 4: If you wish to bypass the Recycle Bin for all the drives available in your system, the user must make changes in the Global tab. If the user wants to bypass for a certain drive only, then the changes must be made for that drive only

• Step 5: Now click on the “OK” button for saving the settings

This will make sure that the files and folders you delete will get deleted permanently without being stored in the Recycle Bin. If you still have issues, contact a computer repair service for assistance.

Steps to Using Your Photos as Windows XP Screen Saver

Windows XP allows you to use your own photos as screensavers. You may choose a folder that contains all the photos that you want to be displayed as screensavers when you are not using your machine. There are lots of options that you can take your pick from to decide on how you want the photos to be displayed. There are several steps that you can follow for using your pictures as screen savers, or you may also take the help of a remote PC support service, if you are not experienced in using computers.

Windows XP Screen Saver• Step 1: Right click on an empty spot on your desktop

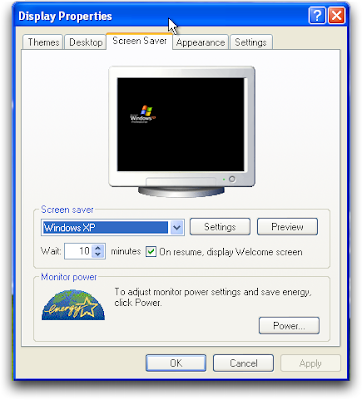
• Step 2: Now choose “Properties” option from the list of options that appear. The “Display Properties” window will be opened

• Step 3: Select the tab that is labeled “Screen Saver

• Step 4: There will be a dropdown list from which you have to choose the “My Pictures Slideshow” option

• Step 5: Now look for the button that is named “Settings” for opening the screen saver settings

• Step 6: Now click on the “Browse” button and then choose the folder where you have store all your photos

• Step 7: You also have the opportunity to choose from the many options like transition effects, picture changing frequency, and other options

• Step 8: Click on the “OK” button for saving the many changes

These steps should help and if they don’t, then contact an online technical support.

Steps to Creating XPS Documents in Windows 7

The XPS format of documents will very soon take over the very popular PDF documents; so, thinks Microsoft. All the Windows 7 users must know that Windows 7 has an in-built XPS document viewer. Note that a majority of the documents that are available on the Microsoft’s site are also available in the PDF format as well as in the XPS format. You may contact the online computer repair services available or may follow some simple steps for creating the XPS documents in Windows 7.

Step 1: Open a document that you wish to convert; you may open a text document in Notepad or an image in a picture viewer.

Step 2: From the toolbar or menu bar, you must choose to print the document. For most of the programs, the shortcut for printing an open document is to press the Control and P keys together.

Step 3: In the Print Options window that opens, you have to choose the printer “Microsoft XPS Documents Writer”.

Step 4: Now a “Save As” dialog will open and the user will be asked to select a file name for the new XPS document.

Step 5: Now Windows will create the document that the user can open by double clicking on the XPS file

If you are still facing problems, immediately contact a computer repair for assistance.

Ways to Improve Font Display in Windows XP

Attention all Windows XP users, have you heard of Clear Type? It is actually a font display technology that is in-built into the Windows XP operating system. The font display is enhanced best in LCD monitors, but you will also be able to notice the effects in your CRT monitors. You just have to follow some simple steps in using the Clear Type technology. However, you may also get in touch with an online computer repair service provider for help.

Step 1: Firstly, the user has to right click on the desktop.

Step 2: You have to click on “Properties” in the context menu that appears. Now the “Display Properties” window should be appearing.

Step 3: Click on the “Appearance” tab.

Step 4: Now click on the “Effects” button.

Step 5: Furthermore the user has to check the box that is labeled “Use the following method to smooth edges of screen fonts:” for enabling it by clicking the checkbox.

Step 6: From the drop down menu, you must select “ClearType.”

Step 7: Now click on “OK” for saving the changes that you have made.

Step 8: You have to click on “OK” again for exiting the “Display Properties” window.

This should get your job done. If you are still facing problems, contact an online technical support provider immediately.

Poll

powered by Blogger | WordPress by Newwpthemes | Converted by BloggerTheme