Way to Bypass Recycle Bin When Deleting Files in Windows 7
 4:20 AM
 James Madison
, Posted in
Computer Repair Service
,
Recycle Bin
,
Windows 7
,
Windows 7 Operating System
,
0 Comments
James Madison
, Posted in
Computer Repair Service
,
Recycle Bin
,
Windows 7
,
Windows 7 Operating System
,
0 Comments
Whenever you delete a folder or a file while working on Windows, you know that it gets stored in the Recycle Bin. Recycle Bin lets the user delete the files and folders permanently or choose to restore them later. Windows 7 operating system also lets the user bypass the Recycle Bin and then delete the files permanently. This can be done by following certain steps or you may also choose to take the help of a remote PC support provider. Note that by bypassing Recycle Bin, you will not be able to restore the deleted files from the Recycle Bin.
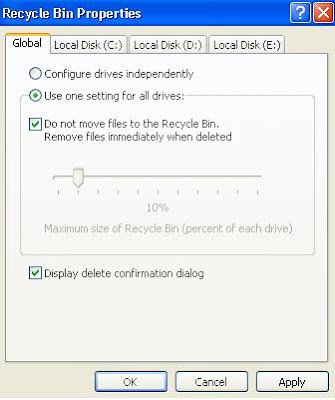 • Step 1: Right click on the Recycle Bin icon that is available on your desktop.
• Step 2: Select Properties from the list of options available
• Step 3: From the Recycle Bin Properties window, the user must select “Do not move files to Recycle Bin” option
• Step 4: If you wish to bypass the Recycle Bin for all the drives available in your system, the user must make changes in the Global tab. If the user wants to bypass for a certain drive only, then the changes must be made for that drive only
• Step 5: Now click on the “OK” button for saving the settings
This will make sure that the files and folders you delete will get deleted permanently without being stored in the Recycle Bin. If you still have issues, contact a computer repair service for assistance.


