Showing posts with label Windows XP. Show all posts

Learn to Change Icon Size of Programs in Start Menu of Windows XP

 Change Icon of Windows XPIf you are using Windows XP operating system, know that you have the option to have large sized program icons in the Start Menu. You may change the icon sizes according to your preference and may easily do that. For this, the users may follow some tips and achieve the task themselves, or they may also look for the services of a reputed online technical support for assistance in case they are not too confident in doing the work themselves.

• Step 1: The user has to right click on the Start Menu and then select Properties from the menu list.
• Step 2: You will now get a window called Taskbar and Start Menu Properties; here, the user needs to click on the Customize button.
• Step 3: Now the user must select the tab labeled General in the Customize Start Menu window, in case it has not been selected already.
• Step 4: Under the group box called Select an icon size for programs, the user must select the options Large icons or Small icons as they wish.
• Step 5: At the final step, the users must click on OK for saving the changes made.

If you face any problems, you may contact any computer repair service for help.
Ways to Apply Folder Settings to All Folders in Windows XP

Folders in Windows XPIf you are using the Windows XP operating system, you have the opportunity to apply folder settings to all Windows XP folders. After the user has changed the settings of a folder, users expect that all folders in Windows will open in the same way. This can be done. The user just has to apply the settings of a folder they prefer to all the other folders in their operating system. You may do it yourself or may seek the online computer repair services for assistance.

• Step 1: Open the folder for which the settings have been changed according to your preferences.

• Step 2: Now from the menu bar, the user must select the “Tools” option and then access the “Folder Options”.

• Step 3: In the Folder Options window, the user must choose the “View” tab.

• Step 4: Now look for the button that is labeled “Apply to All Folders” and click on it.

• Step 5: Finally, the user must click on “OK” for saving the settings and then close the Folder Options window.

This should give uniform settings to all the folders in your Windows XP computer system. In case you are still facing problems, you may contact a remote PC support provider for help on computer issues.

Steps to Using Your Photos as Windows XP Screen Saver

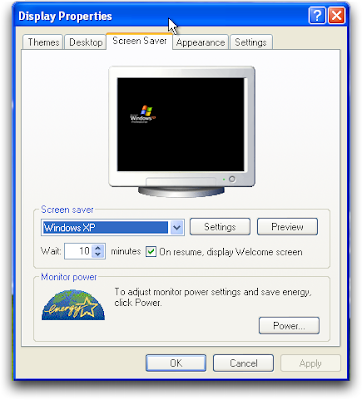
Windows XP allows you to use your own photos as screensavers. You may choose a folder that contains all the photos that you want to be displayed as screensavers when you are not using your machine. There are lots of options that you can take your pick from to decide on how you want the photos to be displayed. There are several steps that you can follow for using your pictures as screen savers, or you may also take the help of a remote PC support service, if you are not experienced in using computers.

Windows XP Screen Saver• Step 1: Right click on an empty spot on your desktop

• Step 2: Now choose “Properties” option from the list of options that appear. The “Display Properties” window will be opened

• Step 3: Select the tab that is labeled “Screen Saver

• Step 4: There will be a dropdown list from which you have to choose the “My Pictures Slideshow” option

• Step 5: Now look for the button that is named “Settings” for opening the screen saver settings

• Step 6: Now click on the “Browse” button and then choose the folder where you have store all your photos

• Step 7: You also have the opportunity to choose from the many options like transition effects, picture changing frequency, and other options

• Step 8: Click on the “OK” button for saving the many changes

These steps should help and if they don’t, then contact an online technical support.

How to Access Computer Information via the System Information Tool

If you are a Windows XP user, you will find that the operating system has an in-built tool that provides a lot of information on your system. It is possible to access the information on your system, so that as a user you can have fast access to software environment information and hardware resource. It also provides access to the system history, component and application data, as well as useful tools like Net, Direct X Diagnostics, and more.

When it comes to troubleshooting, the System Information tool works brilliantly as you can know which programs have experienced serious errors, and also know about running tasks, driver details and network connections. There are some steps that you need to follow for accessing the System Information tool in Windows XP in case such a need occurs.

• Step 1: Click on the Start menu and then access Run by clicking on it

• Step 2: in the box that appears, you have to enter "msinfo32.exe". Make sure you enter this in the Run field without the quotes.

• Step 3: Now click on OK. This should give you access to the System Information tool.
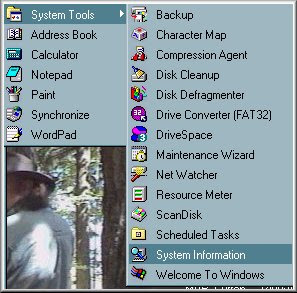
If you want to open the system Information tool directly from the Start menu, you have to follow some steps.

System Information Tool• Step 1: Click on the Start menu and go to All Programs

• Step 2: Then access Accessories from the list that appears and click on System Tools

• Step 3: Now you can access System Information

If you still have problems in accessing the tool, you may contact an online computer repair service for tech support.

How to Disable New Programs Installed Alerts in Windows XP

When installing software into Windows XP computer system, you will find a “New programs installed” alert visible on the Start menu. The freshly installed software is highlighted in the “All Programs” sub menu. If you are a Windows XP operator and find that this alert is disturbing and annoying popping up every time you are installing anew software, you have the option to disable it. You may disable the option totally by following some simple steps or asking an online PC repair service for help if you think that you do not need the new programs installed alerts at all.

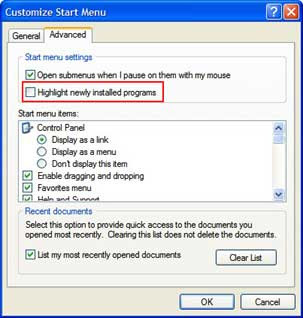
Disable New Programs Installed Alerts in Windows XP• Step 1: Right click on the Start button and then click on Properties. This will enable you to open the window called “Taskbar and Start menu Properties

• Step 2: Click on the “Customize” button for opening the “Customize Start Menu” window

• Step 3: Now click on the “Advanced” tab

• Step 4: You have to remove the tick in the check box that has been labeled “Highlight newly installed programs

• Step 5: Now click on OK for saving the changes. Exit the “Customize Start Menu” window

• Step 6: Click OK again. This will enable you to exit the “Taskbar and Start menu Properties” window.

This should help you disable the "New programs installed" balloon from appearing every time you install new software. If things do not work out, you can get an online technical support to help you.

Poll

powered by Blogger | WordPress by Newwpthemes | Converted by BloggerTheme