How to Access Computer Information via the System Information Tool

If you are a Windows XP user, you will find that the operating system has an in-built tool that provides a lot of information on your system. It is possible to access the information on your system, so that as a user you can have fast access to software environment information and hardware resource. It also provides access to the system history, component and application data, as well as useful tools like Net, Direct X Diagnostics, and more.

When it comes to troubleshooting, the System Information tool works brilliantly as you can know which programs have experienced serious errors, and also know about running tasks, driver details and network connections. There are some steps that you need to follow for accessing the System Information tool in Windows XP in case such a need occurs.

• Step 1: Click on the Start menu and then access Run by clicking on it

• Step 2: in the box that appears, you have to enter "msinfo32.exe". Make sure you enter this in the Run field without the quotes.
• Step 3: Now click on OK. This should give you access to the System Information tool.
If you want to open the system Information tool directly from the Start menu, you have to follow some steps.

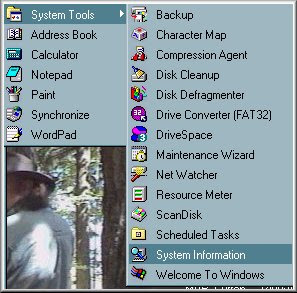
System Information Tool• Step 1: Click on the Start menu and go to All Programs

• Step 2: Then access Accessories from the list that appears and click on System Tools

• Step 3: Now you can access System Information

If you still have problems in accessing the tool, you may contact an online computer repair service for tech support.
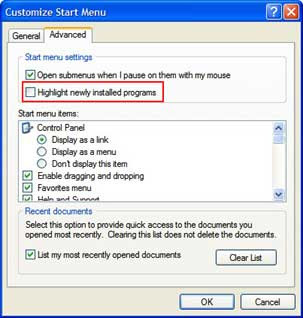
How to Disable New Programs Installed Alerts in Windows XP

When installing software into Windows XP computer system, you will find a “New programs installed” alert visible on the Start menu. The freshly installed software is highlighted in the “All Programs” sub menu. If you are a Windows XP operator and find that this alert is disturbing and annoying popping up every time you are installing anew software, you have the option to disable it. You may disable the option totally by following some simple steps or asking an online PC repair service for help if you think that you do not need the new programs installed alerts at all.

Disable New Programs Installed Alerts in Windows XP• Step 1: Right click on the Start button and then click on Properties. This will enable you to open the window called “Taskbar and Start menu Properties

• Step 2: Click on the “Customize” button for opening the “Customize Start Menu” window

• Step 3: Now click on the “Advanced” tab

• Step 4: You have to remove the tick in the check box that has been labeled “Highlight newly installed programs

• Step 5: Now click on OK for saving the changes. Exit the “Customize Start Menu” window

• Step 6: Click OK again. This will enable you to exit the “Taskbar and Start menu Properties” window.

This should help you disable the "New programs installed" balloon from appearing every time you install new software. If things do not work out, you can get an online technical support to help you.

How to Create Desktop Shortcuts to Go Directly to Websites

Create Desktop ShortcutsIf you are regularly going through certain websites and want to create shortcuts on your Windows XP desktop for your favorite websites, you need to follow some simple steps. You can also ask for technical support from a reputed computer service provider. This will help you access your favorite sites fast and easily.


• Step 1: Firstly, you have to open the website for which you want to create a Windows XP desktop shortcut

• Step 2: Locate an empty spot on your desktop and right click on that spot

• Step 3: Now you will get a small window where you need to point at the “new” option and click

• Step 4: You will get another window which will give you an item called “Shortcut” near the top. You have to left click on this item.

• Step 5: There will be another window providing you the “Create Shortcut” option

• Step 6: Now return to your website browser and in the address box highlight the web address or URL of your favorite website

• Step 7: Right click on the address and then copy it

• Step 8: Now go to the “Shortcut” window, and paste the address into the box and then click on Next

• Step 9: In the next window that appears, you must change the shortcut name to the name of the website. Ultimately click on Finish.

If you face any difficulties to perform this task, you can contact a remote computer repair service for technical assistance.

What to Do When Windows Internet Explorer 7 Crashes

Windows Internet Explorer 7Many people think that Windows Internet Explorer 7 is totally crash-proof, but that is not true. When your IE crashes or closes just after being opened, you will get an error message saying that the IE is not working or may be that it encountered a problem and will close. This kind of a problem can be fixed if you can detect what the issue is. If you are unable to know the problem you can hire the services of an online technical support provider. Usually Windows Internet Explorer 7 crashes due to low memory, as well as missing or corrupted system files.

Try manually disabling all Add-ons

• Step 1: Click on Start menu and open Internet Explorer by clicking on it

• Step 2: Click on the Tools button and then click on the Manage Add-ons option for disabling the Add-ons
If this does not work, try resetting Internet Explorer settings
Resetting Internet Explorer• Step 1: Close the Internet Explorer windows

• Step 2: Now click on the Start menu and then click on Internet Explorer

• Step 3: Click on the Tools button and choose Internet Options and click on it

• Step 4: Click the Advanced tab and then click on Reset

• Step 5: After you have reset the settings, click on Close option and then click OK

• Step 6: Now close the Internet Explorer and then reopen it. This will help the changes be effective.

If nothing works, avail the online computer repair services for assistance.

How to Format a CD

CDIt is to be noted that before you can copy files and folders to a CD, the compact disc has to be prepared through formatting. There are several options for formatting a CD. The live file system discs let you copy files to the CD by just dragging the files. It is also convenient to use the live file system discs, if you want to keep the CD in the burn drive and copy some files at a time, or want to delete individual files or reformat the disc for having extra disc space.

The mastered discs let you drag files to the disc and burn the files together. It also makes it easier for you to burn a large collection of files and is compatible with the old devices and computers like the DVD players and the CD players.

Format a CD
• Step 1: Insert a CD into your machine’s CD drive

• Step 2: You will get a dialog box, where you need to click on “Burn files to disc” option

• Step 3: in the Burn a disc dialog box, you have to type a name for the new disc

• Step 4: Now click on “Show formatting options

• Step 5: Choose from the options “Live File System” or “Mastered

• Step 6: Now click on Next for preparing the disc.

If you are still facing problems, you may contact the computer repair service provider.

Steps to Writing ISO Files to CD or DVD

The ISO files are images of CDs and DVDs, which have been compiled as a whole image file, in the “.iso” format. Note that the ISO images are loadable into different CD and DVD recording packages. This will help burn the .iso files to CDs or DVDs.
ISO Files to CD or DVDUsing the ISO Recorder

The Windows XP freeware utility, ISO Recorder, utilizes the Windows XP functions for writing images to a CD or DVD. The utility can be downloaded from the web page of the author. Just after the installation of the program, it gets associated automatically with the Windows Explorer ISO file extension.

What you need to do

• Step 1: Download the ISO CD or DVD image to a folder on your system.

• Step 2: In the CD-RW drive you have to insert a blank CD or DVD.

• Step 3: Now start the Windows Explorer.

• Step 4: The next step will be to locate the ISO file, and right click the name of the file. For opening the ISO Record Wizard, click “Copy image to CD” option.

• Step 5: Now go by the instructions available in the wizard for writing images to the CD

Another method

• Step 1: Right click on the CD-R drive and select “Copy Image to CD” option

• Step 2: In the window that opens, browse to the ISO file and then click Next
If the afore-mentioned steps do not work, you may call the computer repair New Zealand service for technical support.

Poll

powered by Blogger | WordPress by Newwpthemes | Converted by BloggerTheme